Tynemouth Photographic Society


Sections in this page
Contributions welcome (for this and other pages)!
Do you have a tip that may help other members? Or perhaps a question that we could usefully answer here? Contact the web master. Otherwise we are only guessing at things that people may like to know.
There many ways of doing useful things with multiple exposures, even of the same scene. Graham Relf gave a presentation on the subject in October 2020 which may be seen here as an MP4 video.
Our cameras, display screens and projected images all tell us that red plus green makes yellow. Red and green are primary colours and yellow is secondary. But if we have done any painting we think of yellow as a primary colour. Mix it with blue to make green - right? Why the difference?
Red light and green light together stimulate our eyes to give the sensation of yellow. The colours add.
Paint and printing ink work differently. Yellow ink looks yellow because it is absorbing blue but reflecting red and green. Cyan ink, which we perceive as light blue, absorbs red but reflects green and blue. So if we mix yellow and light blue, perhaps by printing them on top of each other, they absorb blue and red, leaving only green to be reflected. Thus yellow and (light) blue paint make green. The colours subtract.
Printing a photo obviously means putting inks on paper and they combine in this subtractive way. So printing requires Cyan, Magenta (absorbs green) and Yellow inks: CMY.
In the camera/display world the primary colours are Red, Green and Blue (RGB) but for printing CMY are considered primary.
What about K? It stands for blacK (because B is already taken for Blue). In principle you could get black by mixing cyan, magenta and yellow inks but in practice that produces a muddy textured mess rather than a uniform black, so a fourth ink is always used: pure black.
Our software, Photoshop or Affinity, converts the RGB values of every pixel to the required amounts of CMY and K for printing. If you search online you will see that there is not a unique formula for doing this. As with everything to do with colour there are subtleties to consider. Not least of those is the fact that the range of colours (the gamut) displayable on a screen is not the same as can be printed on paper.
QED
The free version of Nik Collection (that was supplied by Google a few years ago) works in Affinity Photo.
In Windows 10 the important part is to identify the plug-ins directory for installing Nik which is C:\ProgramData\Affinity\Photo\1.0\plugins
For the Mac there are instructions here: https://www.photography-raw.com/install-nik-collection-plugins-affinity-photo/
See this PDF file.
Note that the Digital & Practical Group's page has more information on Affinity and other photographic topics.
by Keith McWhirter
Remembering the past and my training to become a Professional Photographer the article about No Photos on the Metro [see Film Pack 340, August 2019] opened my memory bank.
To start, The LAW is you are only allowed to take photographs on Common Land in the United Kingdom. EXCEPT! At this moment it is on the shelf.
This Law is PUT ASIDE so that in the event of a declaration of WAR or Disaster it can without a pause or delay be brought out to protect the Nation.
Although you can be informed by signs etc that photography is not permitted: RAF airfields, Naval shipyards etc.
I had many a warning. One was for filming a Warship's upper structure as it was top secret; my reply to that was "well it should have had a notice on it".
The biggest blow is being served a "D" notice as you are totally incommunicado.
Next you are NOT allowed to take photographs of Any Law Court if the judge is sitting or in session (normally a Flag will be flown when a court is in session).
An example of how you can be Arrested & Jailed for any period of time is that you photograph a person who happens to be en-route to attend a trial & complains to the sitting judge. He can state you have infringed the Precinct of the court.
NOW you ask how? The law states that the judge can declare at that moment any-where in the city or area is within the precinct of his Court.
So you cannot win "LOCK HIM UP".
You can take photographs of ANYONE in a public place and that includes Bands singers and performers provided they are not used for Broadcast.
Because of music rights and copy rights etc; one way out of using photographs, is to make a SMALL payment. You have then not infringed copyright just not paid a lot more and it is then debateable.
You must take care not to imply guilt etc by for example showing a police officer speaking to a person at a crime scene or accident.
There are more similar incidents in relation to taking photos. It is a strong talking subject.
Several of the tools in Photoshop/Affinity involve a small circular patch for applying to a local area. The clone tool and the healing brush are examples. Did you know that you can adjust the size of the patch very conveniently by using the square bracket keys? [ makes it smaller, ] larger.
In these digital days when anyone can take decent photos, traditional photographer's terminology is becoming superceded by neologisms. A case in point is the photographic stop. Nowadays people refer to EVs, short for Exposure Values. They are essentially the same. Adjusting the camera by 1 unit in either scale means doubling the amount of exposure (or halving if it is minus one unit). There are 3 ways to increase exposure by 1 stop (or EV) on a digital camera:
Doing all three things increases by 3 stops (or EV) of course, which means 8 times the exposure (2 cubed).
What are those f-numbers quoted for lenses? Why are they not whole numbers? And why are the smallest values considered desireable? Here we aim to dispel some of the mystery.
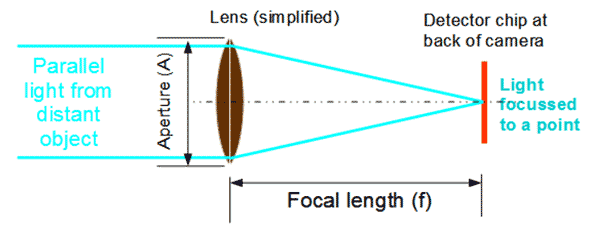
f stands for the focal length of the lens. Camera lenses contain many pieces of glass but if you consider a simple magnifying glass, the focal length is the distance you would hold the lens from a piece of paper in order to sharply focus an object that is very distant. For example, it would give the best chance of burning a hole in the paper by imaging the sun on it.
Lenses having smaller focal lengths give a wider field of view, with less magnification. Longer focal lengths give a narrower, magnified, telescopic view.
If we are setting a digital camera manually, rather than relying on its automatic mode, there are three things which can be adjusted:
The aperture is varied by adjusting an iris diaphragm which changes the size of the opening that allows light in through the lens, rather like the irises in our eyes. The amount of light allowed in is determined by the area of the opening, but the diameter is what photographers specify. If we want to halve the amount of light, reducing the area of the circular aperture by 2, the diameter is reduced by a factor of the square root of 2. Hence we are not dealing with whole numbers.
Furthermore, the diameter is not measured in inches or centimetres but as a fraction of the focal length, f. If the aperture has a diameter which is a quarter of the focal length of the lens we say it is set to f/4. So the f-number in this case is 4.
This may seem awkward but it has the great merit that if we set the same f-number on different lenses maybe with very different focal lengths, we will get the same amount of exposure, other settings also being equal (T and ISO).
A diagram and summary may help:
Do not be confused by a diameter in mm printed on the rim of the lens. That has nothing to do with the aperture but is the diameter of the threaded ring for attaching filters.
Varying the f-number affects more than just the amount of light entering. Setting a small aperture (large f-number, such as f/22) makes a greater depth of field. In other words the range of distances that are all in focus is greater. Sometimes this is desireable, sometimes not. To make a bird stand out from the background we might want a very shallow depth of field, so only the bird is in focus and the background is blurred out. In that case a larger aperture (smaller f-number, such as f/2.8 if the lens is capable of it) would do the job.
This is exactly why we sometimes need to use the manual settings. In automatic mode the camera cannot guess whether you want the background in focus.
Lens focal length (mm):
Detector size (mm): x (36 x 24 is full frame)